I highly recommend you bring your phone on this day to take pictures of the entire process of calibration.
Marking Known Values
- Complete the build of your hydrometer, making sure that it is water tight.
- Place your hydrometer in the graduated cylinder labelled "A." This cylinder contains water, at a density of 1.000 g/ml.
- Once your hydrometer has settled in the graduated cylinder, take note of the EXACT height at which the water level sits.
- Mark the water level on your hydrometer and label it 1.0. Note: Do this in pencil, pen/marker will not stay on you hydrometer in later steps, it will dissolve in one of the calibration fluids.
- Take your hydrometer out of graduated cylinder "A" and dry it completely. Do this gently, as you do not want to rub off any part of the materials used to make your hydrometer.
- Repeat steps 2 through 5 above, this time placing it in the graduated cylinder labelled "B," which contains 70% isopropyl alcohol, at a density of 0.875 g/ml.
Completing The Scale
You should now have two labelled lines on your hydrometer.
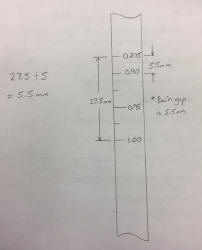
- Using a ruler, measure the distance between the two labelled lines on your hydrometer.
- Divide this number by 5 (you are doing this because to get from 0.875 to 1.000 you can add 0.025 five times, so you are going to add new lines to show every jump of 0.025).
- From the 0.875 measure down by this newly calculated number (the number you got when you divided by 5).
- Mark this location, labelling it 0.9 (this is 0.875 + 0.025).
- Find the center location between the 1.0 and the 0.9 mark you have just made.
- Mark and label this location 0.95
- Using a ruler, divide both of the two new sections (1.0 to 0.95 and 0.95 to 0.9) in half.
- Mark these locations, but do not label them (it just gets too crowded, but you know they are 0.975 and 0.925).
- You should now have 6 lines on your hydrometer (including the 0.875 mark).
- Use the scale your have created to extend the scale of your hydrometer up until you have labelled 0.8 g/ml.
- Also use the scale to extend the scale of your hydrometer down until you have labelled 1.25 g/ml.
Here is an example of the calculations for steps 1 and 2 and an example of completing steps 3 through 9.

Checking Your Hydrometer
- Place your hydrometer in the graduated cylinder labelled "C." This cylinder contains a salt water solution, at a density of 1.05 g/ml.
- Once your hydrometer has settled in the graduated cylinder, use your scale to take a reading, checking the accuracy of your hydrometer.
- If your results are not accurate, check it in "A" and "B" to see if you have made any errors.
You now have a hydrometer that can measure the density of a fluid ranging from 0.800 through 1.250 g/ml.
*Note: Hydrometers measure specific gravity, but for our purposes and the fluids used, it is density.
The testing link on the side menu explains how your hydrometer will be tested.